DIY ladder bookshelf
Customize your bookshelf to your space.
The sunroom on the back of my house is my favorite room and one of the main reasons I bought my house. And when I renovated it we installed a long wall of bead board with hidden doors for the pantry and laundry room. It seemed pretty cool at the time, but now it's a blank wall begging for some love and decoration.
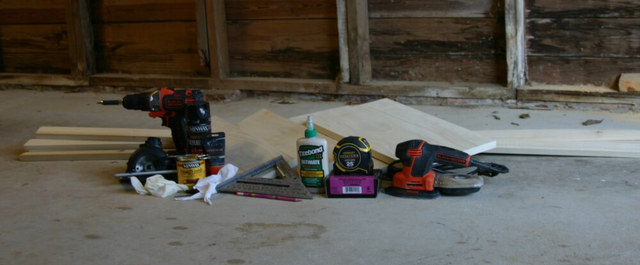
Things You’ll Need

I've seen some great ladder-shaped bookshelves in various magazines and on the infamous Pinterest. But when I tried to purchase one online, they were too big to fit between the two doors and VERY expensive.
So with a little ambition, I set out to build my own. And there’s two of the many reasons I love to DIY, you can save money and fit it exactly to your space. No compromises.
Before I went to the home center, I measured the wall where I wanted my bookshelf to live. The maximum width was 19 ¾ inches. With that in mind, I figured the shelves should be 18 inches wide. So when you add ¾ times 2 for the width of the vertical frame, it’d be right under the 19 ¾.
It's good to know the exact measurements you want before you go since most home centers will cut your lumber in the store. (Up to 2 cuts are free. Most charge 25 cents for additional cuts). However, the material I bought was sold by the foot. So they had to cut it regardless. Here's what I had cut:
- (5) 1x2x6 poplar
- (2) 12 x 18 poplar
- (1) 8 x 18 poplar
- (1) 6 x 18 poplar
Once home I laid out one of the 1x2s and marked where I wanted the bottom of each shelf to rest.
Then I was able to determine the angle I needed the second 1x2 to be. (It needed to be enough of an angle so I could attach the bottom shelf to it, but not so much that the shelf was sticking way out).
Then I double-checked all of the measurements before marking where I needed to cut the angled 1x2 with a speed square.
Making that cut with a circular saw, I laid it back in place so I could mark where to cut the bottom of the same piece. For that, I laid an extra 1x2 flat against the bottom of the straight vertical piece and angle piece and made a small mark.
With both of those cuts made, it was time to mark the tops of both 1x2s to get a straight finish.

After checking all measurements again, I laid the angled piece I just cut on top of a fresh 1x2 to mark the same 3 cuts. And I cut a 4th 1x2 to length to match the other straight 1x2.

I then used the last 1x2 to create the back lip for each shelf board. Since they are all the same length, I cut (4) 18-inch pieces.
This is where the 240 grit sandpaper and sander come in handy. Run the sander over every side of every piece, paying special attention to the edges where splinters may be sticking out.

Then I was ready for assembly! I started by attaching the 1x2 trim to each shelf board. They butted up to each other to create an 'L' shape.
From the back of the trim piece, I drilled 3 pilot holes before using the 1 5/8 trim screws to attach it to the shelf. Multiply that times 4 and the shelves were complete.

The next step was to create the frame from the 6-foot pieces. I laid them out on a table so I could keep them flat and flush but still be able to glue and drill.

I attached (2) 2¼ inch screws where the cut angle meets the top of the straight 1x2. Once that was tight I repeated for the other set that makes the frame.
Finally, I was ready to attach the shelf boards to the frame. I started by setting the bottom one on its side on the floor and setting one of the frames on top. I set the top shelf under the frame too for balance.

This is where the countersink bit comes in handy. It helps sink the head of the screw down so it isn't protruding and can be masked easily with wood filler or putty. I had to use the countersink bit and a regular drill bit to make sure the pilot hole was as deep as the screws would be. My countersink bit alone was not long enough to do the job.

The placement of these screws is important since the holes created are likely to be seen in the finished product. I attached one into the trim of the shelf and then one into the shelf itself.
Then I drilled a screw near the front of the shelf. Once the back of the shelf was secure and flush with the back of the frame, I knew wherever the front of the shelf hit the frame it would be square and level.
These were all 2 ¼ inch trim screws. The trim screws also help reduce the visibility of the screw holes in the finished product since the heads are smaller than regular screws. But before I attached the screws, though, I applied a small amount of wood glue to each joint. Be sure to check vigilantly for glue runs. They are easy to clean up with a wet rag while the glue is still wet. After the glue dries, it can ruin your stain job!

Once all 4 shelves were installed on one side of the frame, it was time to flip it over.
I measured the overhang on each side of each shelf; to make sure that if there was a 3-inch overhang on the right side, there was also a 3-inch overhang on the left side. Then I attached 3 screws to each shelf again on this side.

With all of the screws in place, I filled the screw holes on both sides with my wood filler. The directions say to use a putty knife, but I find it a whole lot easier to use my finger instead. Squirt some in each hole and make it as flush as possible. It is sand-able, so don't worry about it being too precise.
In fact, the directions say to sand 15 minutes after application. So using a piece of 120, I hand-sanded each filled hole. A few of them required an additional layer of filler to fill in any divots. So 15 minutes later I sanded again.
After waiting for the wood filler to dry for several hours, I opened up my can of stain and got to work. I decided to go with English Chestnut. It was a tough decision between my safe-color Espresso and a “riskier” move to the English Chestnut. I thought it would complement the glazing on my adjacent kitchen cabinets well. And it picked up some lighter brown tones in the rug of the sunroom.

I applied the stain with a clean rag, starting on the outside frames and working my way in and down. Move fast and steady and watch for runs or spots where the stain is thicker. It will show up in the finished product. It's nice to have an extra rag on hand to wipe out the stain in the thicker spots.
I also noticed it was a bit of a struggle to get stain in the corners and creases of the shelves. It helped to have the rag soaking and then basically drip the stain into the tough spots. Make sure to wipe up the excess!
The stain dried overnight before I began the topcoat with some spray fast-drying polyurethane. I went with the semi-gloss sheen since I've found the spray kind is not nearly as shiny as its quart can predecessor.

If you choose to use the spray polyurethane, use it in a well-ventilated area! Outside is great if possible. After waiting a few hours for the first coat to dry, I lightly hand-sanded all of the surfaces with 400 grit sandpaper. Then followed it up with the second and final coat of polyurethane.
It looked so good! The second coat does make a difference!
I waited 12 hours before I brought it inside and started decorating my brand new shelves.

I'm so pleased with how this turned out. Not only does it look just as good as a store-bought version, but it fits my space better and I have the pride of knowing I built it myself!


