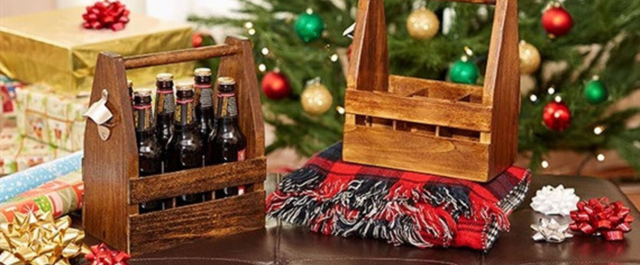
DIY wooden 6-pack holder

Skill Level: Intermediate | Estimated Time: 4 hrs + dry time
This handy drink carrier makes a unique (and easy to make) gift – or put one together for yourself using your favorite BLACK+DECKER products.
Step by Step Instructions
DIY Wooden 6-Pack Holder Diagram
Step 1. Cut the Pieces
Measure and mark your cuts using a speed square and pencil before using your 20V MAX* Cordless Lithium Circular Saw to cut the following pieces.
- (2) pieces of 1 x 6 board, 12” long for the side pieces
- (1) piece of 1 x 6 board, 8-1/2” long for the base
- (1) piece of dowel rod, 9” long for the handle
- (2) pieces of 1/4 x 2, 10” long for the top side fences
- (2) pieces of 1/4 x 3, 10” long for the bottom side fences
- (2) pieces of 1/4 x 4, 5-1/2” long for the dividers
- (1) piece of 1/4 x 4, 8-1/2” long for the long divider
Step 2. Trim Off Pieces
Take the 2, 12” side pieces and measure 6-1/2” up from the bottom of the 6” side and mark a line across.
On the top of the 6” side, measure 1-3/4” from each side at the top edge. Mark diagonal lines to join a top mark and side mark (approximately 18 degrees).
Then, use your circular saw to trim off these pieces from both 6” x 12” boards.

Step 3. Mark Placement for Magnet
Draw a vertical center line on each 6” x 12” side piece.
Make a mark 3/4” down from the top (angled side) along the center line. This is where your handle will go.
Make another mark 2” up from the bottom on the center line on just one board. This is where the magnet will be attached.

Step 4. Drill Half Way Into Board
Use the 3/4” Forstner bit in your SMARTECH™ 20V MAX* Lithium Cordless Drill/Driver and drill halfway into the top mark of each board being careful to keep the bit straight. Do not go all the way through the board.
Tip: Hold the bit to the edge of your boards prior to drilling to know how far down to go so the top won’t break through.
Using a 1-1/2” Forstner bit and the same technique as above, drill a hole in the one board with the bottom mark.
Step 5. Make the Dividers
Now you’ll make the dividers using your 20V MAX* Cordless Lithium Jigsaw.
Take your smaller, 4” x 5-1/2” pieces, and on the long side, make marks 2-5/8” from each side. Cut a 1/4” x 2” notch. Now take the larger, 4” x 8-1/2” piece and make two notches.
From the edge of both shorter sides, mark 2, 2-5/8” lines. Cut a 1/4” x 2” notch in both locations.
Test fit these together to make sure the 2 smaller pieces fit into the larger piece and are flush top and bottom.

Step 6. Sand Smooth
Sand everything smooth with the MOUSE® Detail Sander and 120 grit sandpaper. You will also want to round the edges.
Then, use the 220 grit sandpaper on the grain-ends of each board.
Step 7. Begin Assembling the Pieces
Start by attaching the base to the left side panel. Put a bead of glue along each edge before nailing together.
Align the bottom panel flush with the left side panel and place three brad nails in the side panel to attach (the side panel will cover the end grain of the bottom).
Tip: Before gluing and nailing the base and sides together, test to make sure you have drilled the holes for the handle deep enough. To do this, insert the handle into the holes in the side panel and ensure there is no gap between the base and sides. If there is, you will need to drill further into the side panels.
Step 8. Insert the Handle
Put a dot of glue into the 3/4” hole and insert the handle. Repeat steps 7 and 8 for the right side panel to finish the frame.
Step 9. Attach the Side Fences
To attach the side fences, start with the 3” x 10” pieces. Align the bottom of the pieces with the base of the carrier.
Apply a few beads of glue and then nail. Use 2 brad nails on each of the 3” sides and 3-4 brad nails along the bottom.
Step 10. Attach the 2 x 10 Pieces
Then, attach the 2” x 10” pieces following the same process as above.
Leave a 3/4” gap between the top and bottom fences.
Step 11. Insert Magnet
Insert the magnet into the 1-1/2” hole you drilled in Step 4.
Tip: If you need to add glue to ensure the fit, do not use hot glue as this can cause the magnet to lose pull force.
Step 12. Insert the Dividers
Slide the 4” x 8-1/2” into the frame, with the notches facing up. Then, slide each of the smaller pieces onto the larger piece.
Step 13. Stain Your Carrier
After your carrier has been well sanded, wipe off any residual sanding dust and wipe on a wood conditioner prior to staining. Follow the directions for the conditioner you choose.
Once completed, stain your carrier in your choice of stain, again following the directions of the stain you choose. You may need to apply a second coat of stain, depending on how you want the finished product to look.
After allowing the stain to dry overnight, apply a top coat. Give the carrier a light sanding with fine sandpaper and apply the last top coat.
Allow the carrier to cure overnight before the final step, attaching the bottle opener.
Step 14. Attach the Bottle Opener
To finish your carrier, you’ll want to attach the bottle opener on the outer side of the panel that you’ve inserted the magnet into using the 4V MAX* ROTO-BIT Storage Screwdriver.


