


How to make wood pallet wine shelving

Skill Level: Intermediate | Estimated Time: 3 hours
Complete with a handy rack for hanging wine glasses, this wine shelving is simple to make and looks great on your wall, too.
Materials:
- (1) framed section from pallet corner
- (2) pieces of pallet planking the same length as the base of the pallet section (varies by pallet)
- (2) 1" wide shims from pallet planking for spacers
Step by Step Instructions
Step 1. Cut the Pallet
Using your BLACK+DECKER Jigsaw, cut off a corner section of your wood pallet that is clean and free from crushed corners or warped boards. Cut through the thick center struts made from 2 x 4's to determine the height of your shelf. Cut through the horizontal slats to create a small shelf (pictured above), or leave intact for a longer shelf that can hold more wine bottles.
Measure the base length (from the outside edges of the 2 x 4's) to determine the length for the two plank pieces that will serve as the glass rack and base of the shelf. With a hammer or pry bar, carefully remove two pieces of planking from your extra section of the pallet before cutting them to size. The two small shims will create the space between the base and the slotted rack for hanging wine glasses.

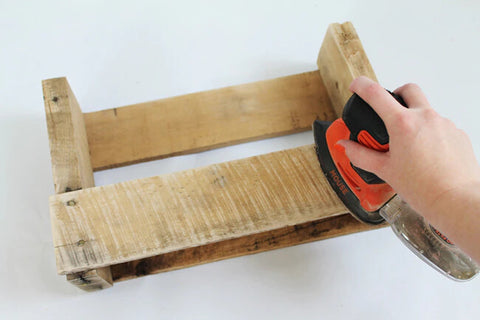
Step 2. Sand Pallet Pieces
Thoroughly sand your cut pieces of pallet and planking with your BLACK+DECKER 20V MAX* Lithium-ion MOUSE® Sander and 80-grit sandpaper. This will eliminate any dirt and rough edges.
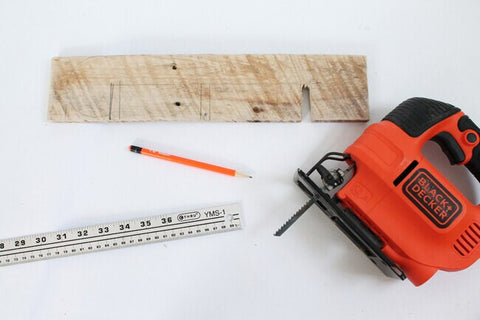
Step 3. Construct Wine Glass Rack
Choose one of the planks for the glass rack. Mark evenly spaced, 2" deep notches along the front edge. Keep the size and quantity of your glasses in mind when determining the spacing and width of the notches, which will hold each wine glass from its base. Cut out the notches with your BLACK+DECKER Jigsaw.
Step 4. Secure Base
Use your BLACK+DECKER 12V MAX* Cordless Lithium Drill/Driver and a 7/64" drill bit to drill pilot holes. Secure the remaining plank to the bottom of the pallet frame with two 1 1/2" wood screws at each end.

Tip: Dry pallet wood splits easily, and drilling pilot holes before driving in screws helps prevent snapping a piece in half. You’ll want to use a bit that has a slighter smaller diameter than the screw’s shank, which is the solid portion of the threaded area.
Step 5. Attach Spacers to Shelf Base
Stand each shim piece on its edge to create 1" spacers between the base and the glass rack. Keep each spacer’s edge square with the base plank, and avoid placing the spacers over the screws securing the base. Drill pilot holes and secure each shim with two 1 1/2" wood screws.

Step 6. Attach Rack to Base of Pallet Shelf
With your drill/driver, secure the glass rack to the spacers by drilling a 1/16" diameter pilot hole on each end and driving in a 1" wood screw.

Step 7. Hang It Up
Sand the assembled shelf with 120-grit sandpaper and apply a wood stain that complements your space, if desired. Sand the finish unevenly for a distressed texture, or leave the wood unfinished for an industrial look. After choosing the perfect spot for your finished pallet wine shelf, hang it with the aid of your BLACK+DECKER ACCU-MARK™ 36 in. Level.
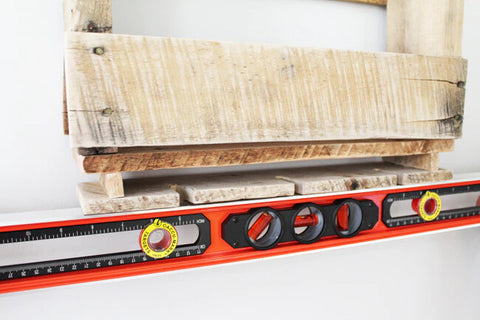
Drill two holes into the back of the shelf and hold it against the wall with the level flush against the base of the unit. Adjust the shelf until it’s perfectly level, and mark the holes with pencil to indicate where to install your drywall anchors. Remove the shelf and install the anchors. Hang the shelf by screwing through the back of the shelf with 1 1/2" wood screws into the anchors.

Tip: Screw-in type anchors are suitable for a small shelf that holds a few full bottles. If you have a larger shelf, screw into the wall studs and/or use heavy-duty anchors, such as toggle bolts.
Step 8. Add the Wine Bottles
Display your favorite bottles of wine and hang up your wine glasses.
Optional: Add a stylized hook on the side of the shelf to hang your wine opener and keep it within easy reach.